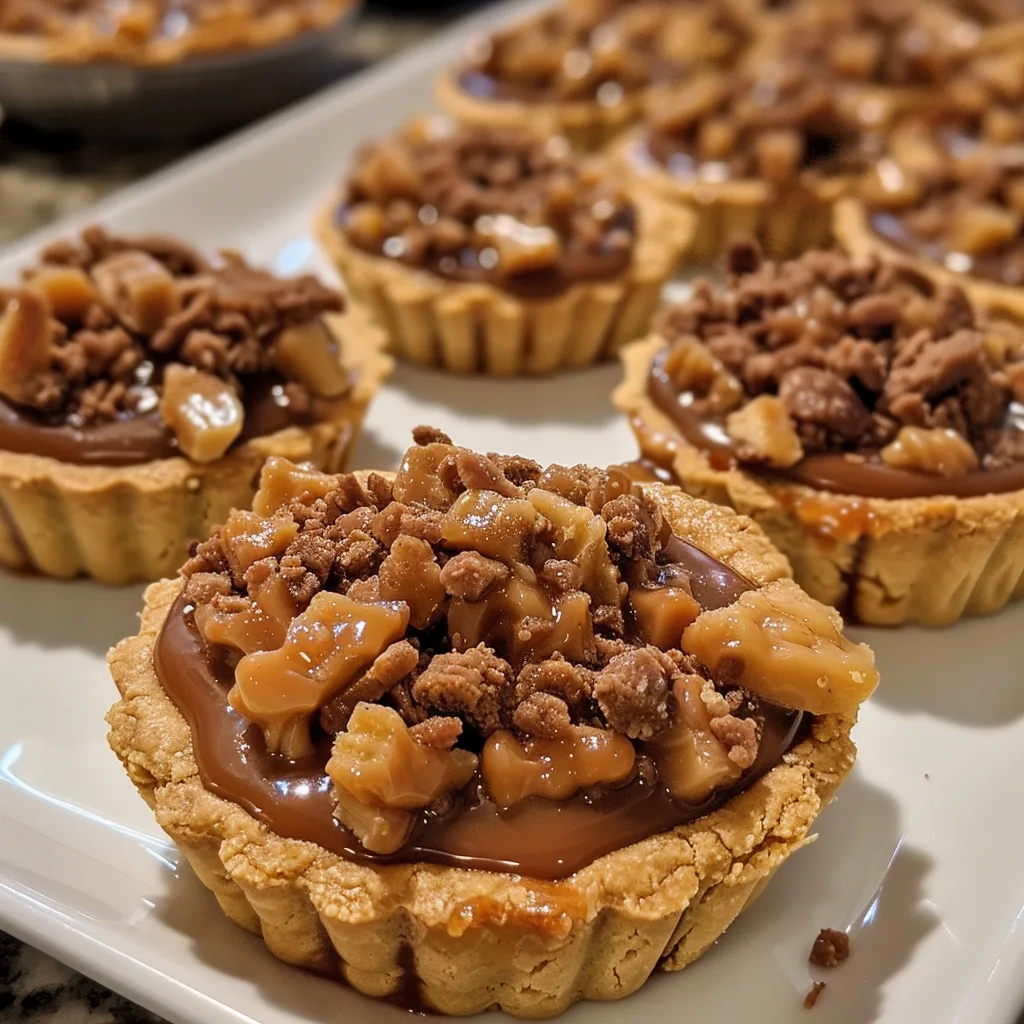
If you’re a fan of buttery caramel, chocolate, and that unmistakable Butterfinger crunch, these Butterfinger Caramel Crunch Mini Pies are about to become your new favorite indulgence. Each mini pie is a perfect medley of creamy caramel filling, silky chocolate, and crispy peanut butter candy bits—all nestled in a buttery graham crust. They’re rich yet balanced, decadent yet perfectly portioned.
When I first tried these, I couldn’t believe how easy they were to make for something that tastes so luxurious. I even swapped the traditional crust for chocolate graham crackers once, and it added a whole new depth of flavor. Whether you’re planning a party, a bake sale, or just need a sweet treat that feels special, these mini pies deliver dessert perfection in every bite.
Why You’ll Love This Recipe
These mini pies combine the textures and flavors dessert lovers crave: crunchy, creamy, chocolatey, and caramel-sweet. They’re no-bake, quick to assemble, and perfect for entertaining or gifting. The Butterfinger pieces add a nostalgic, candy-bar twist that elevates a simple caramel pie into a truly memorable dessert.
Print
- Total Time: 1 hr 15 mins (including chilling)
- Yield: 6 mini pies
- Diet: Vegetarian
Description
Decadent mini pies layered with buttery caramel, creamy filling, and crushed Butterfinger candy bars for the ultimate sweet crunch — a no-bake dessert that’s easy and irresistible.
Ingredients
- 6 mini graham cracker pie crusts
- 1 cup caramel sauce (store-bought or homemade)
- 1 (8 oz) package cream cheese, softened
- 1 (8 oz) container whipped topping (Cool Whip), thawed
- 1/2 cup powdered sugar
- 1 tsp vanilla extract
- 1 cup crushed Butterfinger candy bars (about 4 bars)
- 1/4 cup chocolate chips (optional, for garnish)
- Additional crushed Butterfinger and caramel drizzle, for topping
Instructions
- In a mixing bowl, beat the cream cheese, powdered sugar, and vanilla extract until smooth and creamy.
- Fold in the whipped topping until well combined and fluffy.
- Stir in half of the crushed Butterfinger candy bars into the filling mixture.
- Spoon about 1 tablespoon of caramel sauce into the bottom of each mini pie crust.
- Top with the Butterfinger cream mixture, spreading evenly to fill the crusts.
- Drizzle each pie with additional caramel sauce and sprinkle with remaining crushed Butterfinger pieces.
- Optional: Melt chocolate chips and drizzle over the top for extra decadence.
- Chill the mini pies in the refrigerator for at least 1 hour before serving.
Notes
- For a homemade caramel flavor, use salted caramel for balance against the sweetness.
- Store leftovers in the refrigerator for up to 3 days.
- These can be made ahead and frozen for up to 1 month — thaw in the fridge before serving.
- Substitute with crushed peanut butter cups or toffee bits for variation.
- Prep Time: 15 mins
- Cook Time: 0 mins
- Category: Dessert
- Method: No-Bake
- Cuisine: American
Ingredients
(Tip: You can find the complete list of ingredients and their measurements in the recipe card below.)
Mini graham cracker pie crusts – These ready-made crusts save time and add a perfectly crumbly, buttery base that complements the creamy filling.
Cream cheese – Softened cream cheese provides structure and tang to the filling, balancing out the sweetness of the caramel.
Caramel sauce – The heart of this dessert. Use a rich, thick caramel sauce for best results. Homemade or store-bought both work beautifully.
Whipped topping – Adds lightness and volume to the filling, giving the pies a fluffy, mousse-like texture.
Butterfinger candy bars – Crushed Butterfingers bring that signature peanut butter crunch and a delightful contrast to the creamy caramel.
Chocolate chips – Melted chocolate creates a luscious layer that pairs perfectly with the caramel filling.
Butter – Helps smooth out the melted chocolate, giving it a glossy finish and a rich mouthfeel.
Vanilla extract – Enhances the overall flavor and adds warmth to the filling.
Sea salt – A pinch of flaky salt balances the sweetness and intensifies the caramel and chocolate flavors.
Crushed peanuts (optional) – For extra crunch and a little rustic flair on top.
Directions
Begin by preparing your crusts. If using pre-made mini graham cracker shells, place them on a baking tray for easy handling.
In a microwave-safe bowl, combine chocolate chips and butter. Heat in 20-second intervals, stirring between each, until smooth. Spoon a thin layer of melted chocolate into each crust and spread evenly. Chill for 10 minutes to set.
In a medium mixing bowl, beat the cream cheese until smooth and creamy. Add caramel sauce, vanilla extract, and a pinch of sea salt. Mix until well combined and silky. Fold in whipped topping gently to keep the mixture light and airy.
Spoon the caramel cream filling into each crust, smoothing the tops. Chill in the refrigerator for at least 1 hour to firm up.
Just before serving, drizzle with extra caramel and sprinkle generously with crushed Butterfinger pieces. If desired, top with a few crushed peanuts for added crunch.
For an extra indulgent touch, I like to add a small dollop of whipped cream on each mini pie and a drizzle of melted chocolate.
Equipment needed :
Must-Have Tools to Get Rolling
Here’s what you’ll want to have on hand:
Silicone Spatula – Durable, heat-resistant silicone spatula perfect for mixing, scraping, and spreading. Gentle on non-stick cookware and easy to clean.
Large pot – You’ll need this to boil the whole cabbage head and soften the leaves.
large bowl –Spacious, durable large bowl ideal for mixing, serving, or food preparation. Made from sturdy material and easy to clean.
Sharp knife – For coring the cabbage and slicing out the thick stem in each leaf. A paring knife works best.
Mixing bowl – A big bowl makes it easier to combine your meat and rice filling evenly.
Cutting board – For prepping cabbage leaves and rolling them like a pro.
9×13-inch baking dish – Ideal size to fit your rolled cabbage leaves snugly and prevent them from unraveling.
knife – A sharp, durable kitchen knife perfect for slicing, chopping, and dicing with ease
Servings and timing
This recipe makes 6–8 mini pies.
Preparation time: 20 minutes
Chilling time: 1 hour
Total time: 1 hour 20 minutes
Storage/reheating
Store the mini pies covered in the refrigerator for up to 4 days. For best texture, keep them chilled until ready to serve. They can also be frozen for up to 1 month—just thaw in the fridge overnight before serving. Avoid reheating, as these pies are meant to be served chilled.

Variations and Customizations
Chocolate Lover’s Dream – Add a layer of chocolate ganache on top before sprinkling the Butterfinger bits.
Peanut Butter Twist – Swirl a tablespoon of peanut butter into the caramel filling for a richer, nuttier flavor.
Oreo Crust Swap – Use mini Oreo pie crusts instead of graham for a more chocolate-forward dessert.
Salted Caramel Version – Add a sprinkle of flaky sea salt on top for a perfect sweet-salty balance.
Mini Tart Form – Press graham crumbs into silicone molds for homemade mini tart shells instead of store-bought.
Whipped Cream Topping – Pipe a swirl of fresh whipped cream on top for an elegant finish.
Candy Bar Mix-Up – Try mixing in chopped Snickers or Reese’s instead of Butterfinger for fun variations.
Frozen Treat Version – Freeze the pies for a cool, ice-cream-like texture during the summer months.
Bourbon Caramel Upgrade – Add a splash of bourbon to the caramel sauce for a grown-up twist.
Festive Edition – Sprinkle with crushed pretzels or toffee bits for a holiday-inspired crunch.
FAQs
Can I make these ahead of time?
Yes, they can be made 1–2 days ahead and kept chilled until serving.
Do I need to bake the crusts?
No, store-bought mini graham crusts are ready to use.
Can I use homemade caramel sauce?
Absolutely—it adds an even deeper flavor.
How do I crush Butterfingers easily?
Place them in a zip-top bag and gently crush with a rolling pin.
Can I use a large pie crust instead of minis?
Yes, simply make one 9-inch pie instead of several minis.
How do I keep the chocolate layer smooth?
Add butter when melting the chocolate to keep it glossy and soft.
Can I make it without cream cheese?
You can substitute mascarpone or even whipped cream for a lighter texture.
How do I make it gluten-free?
Use gluten-free graham crusts and check your candy bars for gluten-free labeling.
Can I add a caramel layer under the filling?
Yes, a thin caramel layer on top of the chocolate base makes it extra indulgent.
How long should I chill the pies?
At least 1 hour, but 2 hours gives an even better texture.
Conclusion
These Butterfinger Caramel Crunch Mini Pies are the perfect mix of nostalgia and indulgence. With layers of chocolate, creamy caramel filling, and that signature Butterfinger crunch, they deliver the ultimate dessert experience in every bite. Whether you serve them at a party or keep them as your personal sweet secret, these mini pies prove that great desserts don’t have to be complicated—they just have to be delicious.
Hungry for more? Visit our website for full recipes and follow us on Pinterest for daily foodie inspo you’ll love to pin!