
Why You’ll Love This Recipe
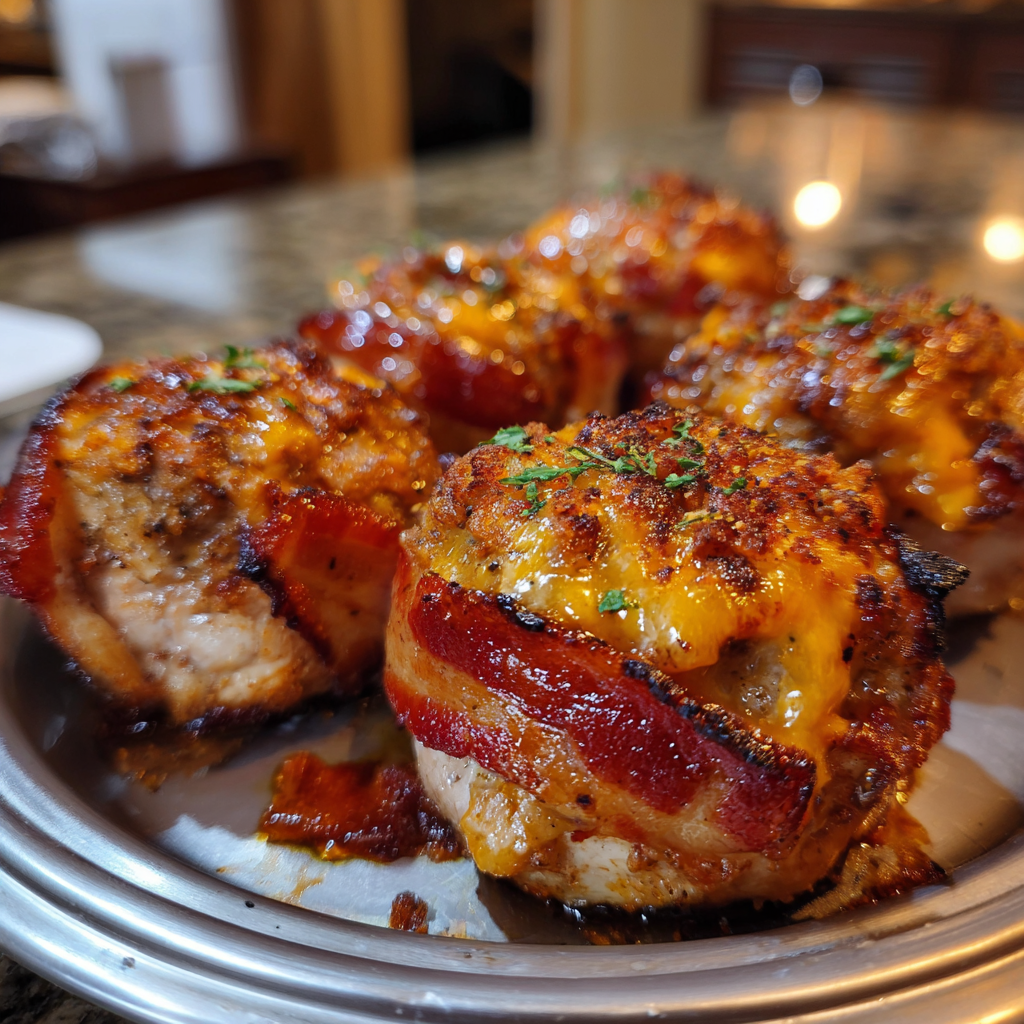
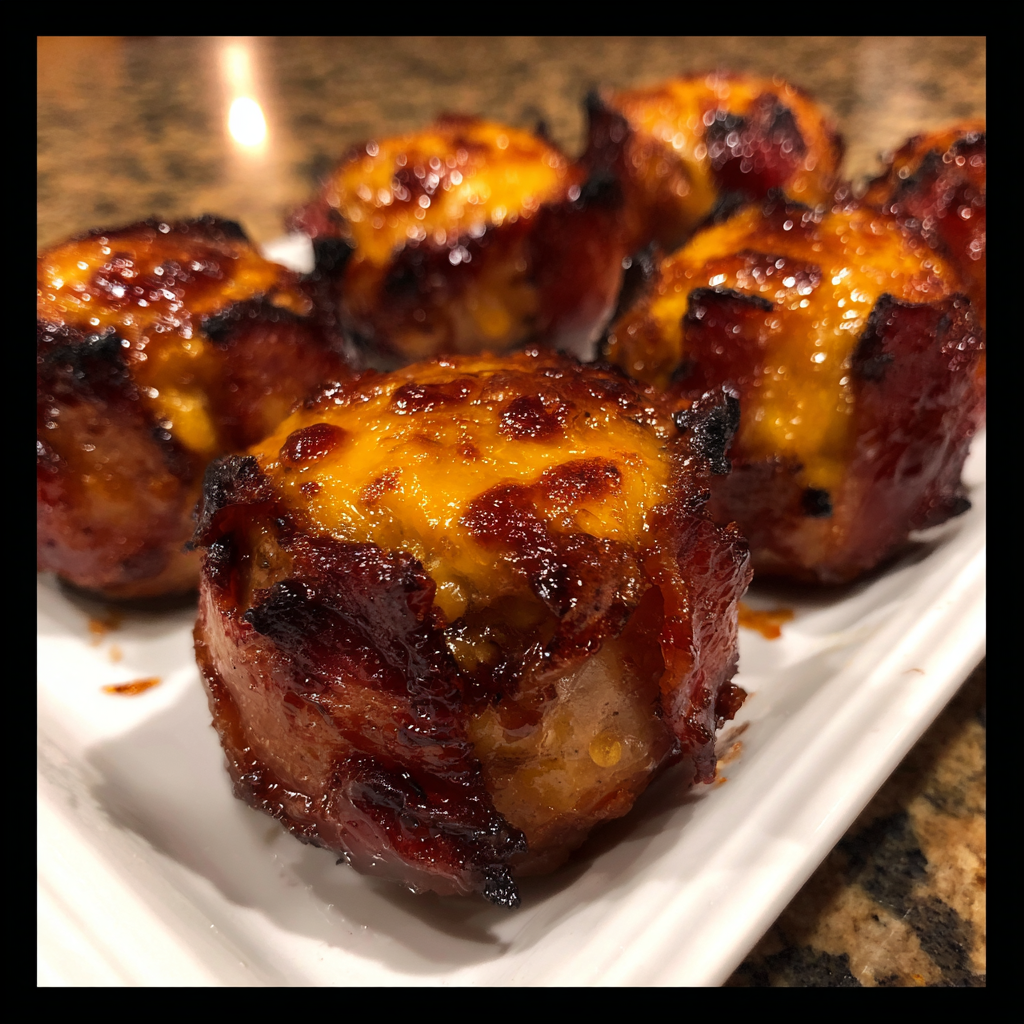
Cheddar-stuffed BBQ bacon bombs are the kind of appetizer that immediately steals the spotlight—crispy, cheesy, smoky, and irresistibly satisfying. Each bite gives you melty cheddar wrapped inside seasoned ground meat, all encased in a beautifully caramelised bacon lattice brushed with barbecue sauce. They’re hearty enough for game-day spreads yet impressive enough for backyard gatherings. What I appreciate most is how easy they are to customise; you can swap cheeses, adjust the heat level, or even shape them into sliders. When I once tested these with smoked cheddar, the flavour became intensely rich and almost nostalgic, reminiscent of classic barbecue joints. These bacon bombs are an excellent choice when you want something fun, memorable, and undeniably indulgent.
Print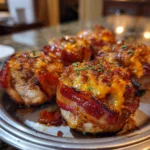
Cheddar-Stuffed BBQ Bacon Bombs: The Ultimate Crowd-Pleasing Appetizer
- Total Time: 50 mins
- Yield: 8–10 bacon bombs
- Diet: Halal
Description
Juicy meatballs stuffed with cheddar cheese, wrapped in bacon, and glazed with BBQ sauce for a smoky, cheesy, crowd-pleasing appetizer or entree.
Ingredients
- 1 1/2 lbs ground beef
- 1/2 lb ground pork (optional, for extra tenderness)
- 1 cup breadcrumbs
- 1 large egg
- 1/2 cup onion, finely diced
- 2 garlic cloves, minced
- 1 tsp salt
- 1/2 tsp black pepper
- 1 tsp smoked paprika
- 1 tsp Worcestershire sauce
- 8–10 cheddar cheese cubes
- 8–10 slices bacon
- 1 cup BBQ sauce
Instructions
- Preheat oven to 400°F (205°C) or preheat grill to medium heat.
- In a large bowl, combine ground beef, ground pork, breadcrumbs, egg, onion, garlic, salt, pepper, smoked paprika, and Worcestershire sauce.
- Mix until just combined to avoid tough meatballs.
- Take a portion of the meat mixture, flatten slightly, and place a cheddar cube in the center.
- Wrap the meat around the cheese to form a sealed ball.
- Wrap each meatball with a slice of bacon, securing ends under the bottom or with toothpicks if needed.
- Place bacon bombs on a lined baking sheet or grill.
- Bake or grill for 20–25 minutes, until bacon is crisp and internal temp reaches 165°F (74°C).
- Brush generously with BBQ sauce and cook an additional 5 minutes.
- Serve hot with extra BBQ sauce if desired.
Notes
- Use thick-cut bacon for sturdier wrapping, or thin-cut for faster crisping.
- Freeze cheese cubes for 10 minutes to prevent leaking during cooking.
- Great as appetizers or served over mashed potatoes or buns.
- Prep Time: 20 mins
- Cook Time: 30 mins
- Category: Appetizer
- Method: Baking or Grilling
- Cuisine: American
Ingredients
(Tip: You can find the complete list of ingredients and their measurements in the recipe card below.)
Ingredients Breakdown
Ground Beef
Ground beef forms the core of the bacon bomb, offering structure, juiciness, and a rich, savoury foundation. An 80/20 blend works well, keeping the interior moist without causing excessive shrinkage.
Cheddar Cheese
Cheddar provides the molten centre that makes these bombs so appealing. Sharp cheddar gives more flavour, while mild cheddar melts more smoothly. You can cube it for a defined centre or shred it for more even distribution.
Bacon
Bacon wraps each bomb completely, delivering crispiness and smoky depth. As the bacon cooks, it bastes the meatball from the outside, helping retain moisture and enhancing overall flavour.
BBQ Sauce
Barbecue sauce gives the bombs a sticky, caramelised glaze. A smoky or spicy sauce works wonderfully, though sweeter styles provide a pleasant contrast to the salty bacon.
Breadcrumbs
Breadcrumbs help bind the ground meat and maintain tenderness. They also absorb moisture, preventing the bombs from becoming dense.
Egg
The egg binds the meat mixture, ensuring the bombs keep their shape during cooking.
Worcestershire Sauce
This adds a subtle savouriness and enhances the meaty flavour, complementing the beef and bacon without overpowering the barbecue glaze.
Onion Powder
Onion powder seasons the meat mixture uniformly, adding aromatic depth without introducing fresh onion moisture.
Garlic Powder
A key seasoning that boosts savoury richness and balances the sweetness of the barbecue sauce.
Salt and Black Pepper
These essential seasonings bring out the flavours of both the beef and bacon. Because bacon is naturally salty, use salt sparingly.
Directions
Begin by preparing the meat mixture. In a large bowl, combine the ground beef, breadcrumbs, egg, Worcestershire sauce, onion powder, garlic powder, salt, and pepper. Mix gently—overworking the beef can make the bombs tough. Cut cheddar into small cubes (or use shredded cheddar if preferred).
Form equal portions of the meat mixture and flatten each one slightly. Place a piece of cheddar in the centre and shape the meat around it, sealing well so the cheese stays enclosed as the bombs cook.
Lay out strips of bacon in a crisscross pattern and place a meatball in the centre. Wrap the bacon tightly around the meatball, ensuring full coverage. Repeat for all remaining portions.
Preheat your oven or grill. Arrange the wrapped bombs on a baking sheet or directly on the grill grates. Brush each bomb generously with barbecue sauce, then cook until the bacon becomes crisp and the meat is fully cooked. Midway through cooking, brush on more barbecue sauce to deepen the glaze.
Allow the bombs to rest briefly before serving; this keeps the cheese from spilling out too quickly and allows the flavours to settle beautifully.
Equipment needed :
Must-Have Tools to Get Rolling
Here’s what you’ll want to have on hand:
Silicone Spatula – Durable, heat-resistant silicone spatula perfect for mixing, scraping, and spreading. Gentle on non-stick cookware and easy to clean.
Large pot – You’ll need this to boil the whole cabbage head and soften the leaves.
large bowl –Spacious, durable large bowl ideal for mixing, serving, or food preparation. Made from sturdy material and easy to clean.
Sharp knife – For coring the cabbage and slicing out the thick stem in each leaf. A paring knife works best.
Mixing bowl – A big bowl makes it easier to combine your meat and rice filling evenly.
Cutting board – For prepping cabbage leaves and rolling them like a pro.
Full-Size Blender – is a powerful kitchen appliance for making smoothies, soups, and sauces in large batches.
3-in-1 Air Fryer – This versatile 3-in-1 air fryer offers Air Fry for healthier meals with less oil, Bake for bakery-quality desserts and treats, and Reheat to bring leftovers back to life with crispy, flavorful results
Servings and timing
This recipe typically yields 8–10 bacon bombs. Preparation time is around 20 minutes, and cooking time is about 25–30 minutes depending on the oven or grill, for a total time of approximately 45–50 minutes.
Storage/reheating
Store leftovers in an airtight container in the refrigerator for up to 3 days. Reheat in a 300°F oven until warmed through to maintain crispness. Avoid microwaving if possible, as it may soften the bacon. You can also freeze cooked bombs for up to 2 months; thaw in the refrigerator before reheating.
Variations and Customizations
Spicy Bacon Bombs
Add chopped jalapeños or a pinch of cayenne to the meat mixture for a fiery twist that pairs beautifully with sweet barbecue sauce.
Smoked Cheddar Version
Swap regular cheddar for smoked cheddar. I once tried this variation on a charcoal grill, and the flavour was deeply layered and incredibly satisfying.
BBQ Ranch Bombs
Mix a tablespoon of dry ranch seasoning into the meat for a tangy, savoury boost.
Turkey Bacon + Ground Turkey Option
Use ground turkey and turkey bacon for a lighter but still flavourful version. Keep an eye on moisture levels—adding a bit more Worcestershire helps.
Mexican-Inspired Bombs
Stuff with pepper jack cheese and season the meat with cumin and smoked paprika for a bold Tex-Mex profile.
Mini Bacon Bomb Bites
Make smaller portions and use shredded cheese for bite-sized party appetizers.
Maple-Glazed Bacon Bombs
Brush a mixture of barbecue sauce and maple syrup over the bombs for a sweet, glossy finish.
Onion-Stuffed Bombs
Add a small piece of sautéed onion inside each bomb for a slightly sweeter, deeper flavour.
FAQs
Can I make these ahead of time?
Yes. Assemble them up to 24 hours in advance and refrigerate until ready to cook.
Can I cook these entirely on the grill?
Absolutely. Indirect heat works best to prevent flare-ups from the bacon fat.
How do I prevent the cheese from leaking out?
Seal the meat tightly around the cheese and avoid overstuffing.
Can I use another type of cheese?
Yes, mozzarella, pepper jack, or gouda all melt beautifully.
Do I need to par-cook the bacon first?
No, the bacon cooks fully during the baking or grilling process.
Can I freeze uncooked bacon bombs?
Yes, freeze them on a tray first, then transfer to a container. Thaw before cooking.
What temperature should the meat reach?
Aim for 160°F for ground beef to ensure safe consumption.
Can I make these without breadcrumbs?
Yes, replace breadcrumbs with crushed pork rinds for a low-carb option.
Why are my bombs falling apart?
They may need more binder (egg or breadcrumbs) or tighter bacon wrapping.
Can I use homemade BBQ sauce?
Certainly. A homemade sauce adds a personalised flavour profile.
Conclusion
Cheddar-stuffed BBQ bacon bombs deliver everything you want in a bold, unforgettable appetizer: smoky bacon, savoury beef, molten cheese, and a glossy layer of barbecue sauce. They are fun to prepare, satisfying to eat, and endlessly adaptable. Whether you’re grilling for a summer cookout or building a game-day menu, these bacon bombs offer the perfect balance of flavour, texture, and visual appeal. Once you try them, they’re sure to become a staple in your entertaining repertoire.
Hungry for more? Visit our website for full recipes and follow us on Pinterest for daily foodie inspo you’ll love to pin!