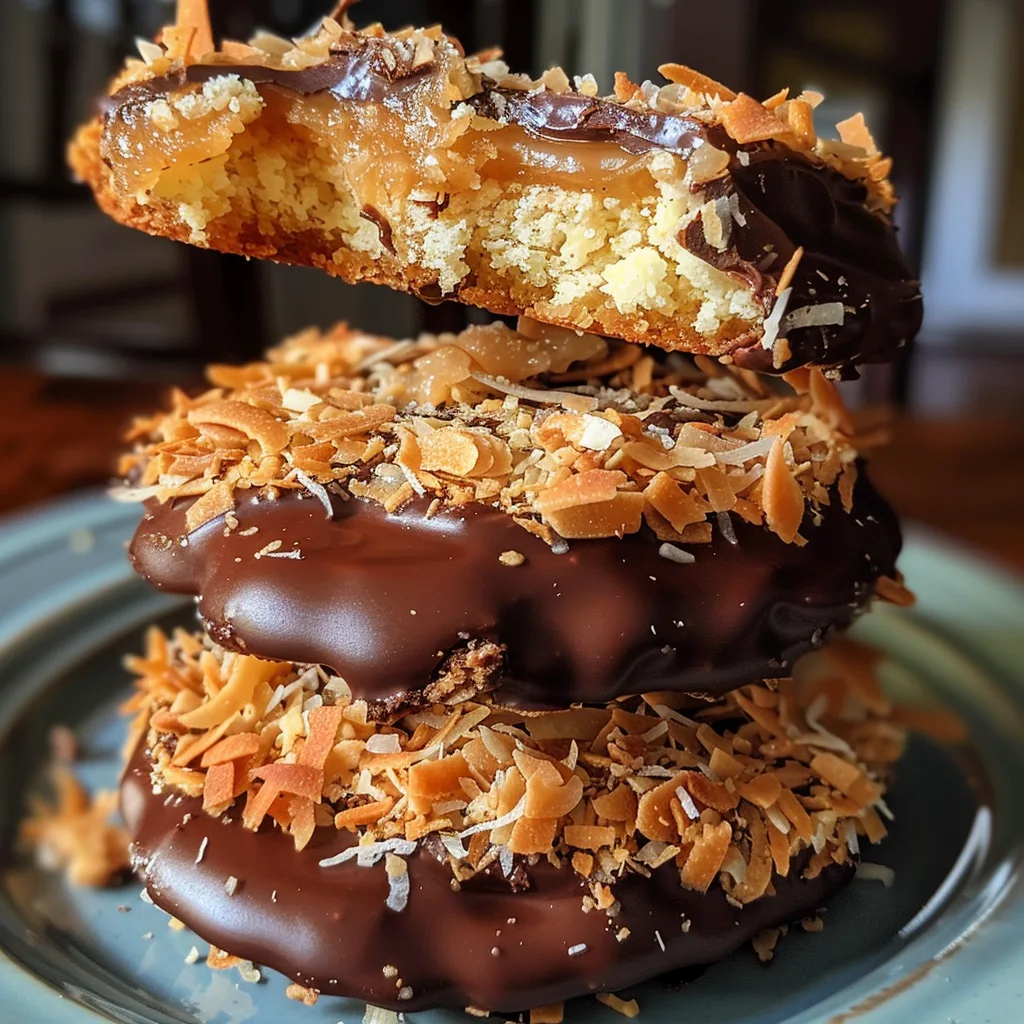
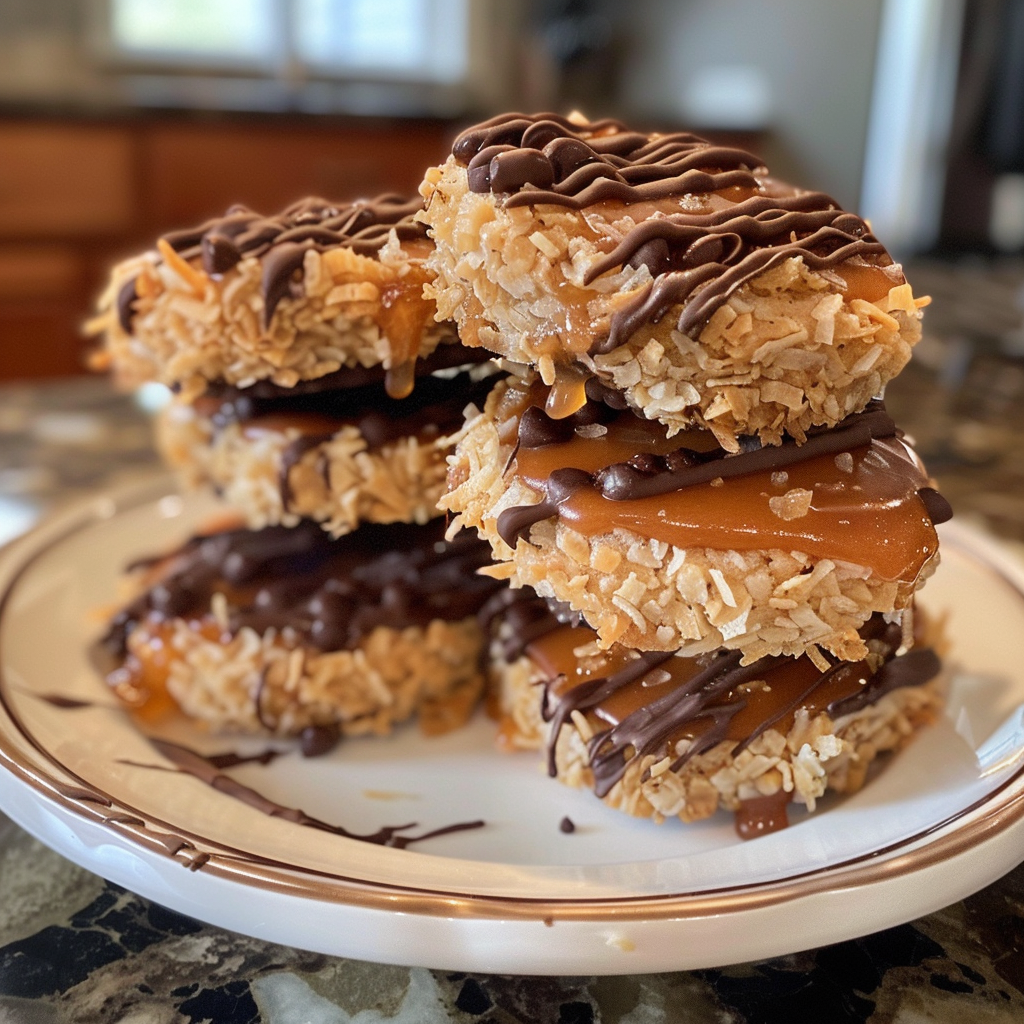
Few cookies can rival the irresistible charm of Homemade Samoas Cookies – Caramel, Coconut & Chocolate Bliss. These classic favorites—often known for their buttery base, gooey caramel layer, toasted coconut topping, and chocolate drizzle—combine sweet, nutty, and rich flavors in every single bite. Making them at home means you can enjoy that same bakery-level perfection without the wait for cookie season. I made these once with dark chocolate instead of semi-sweet, and the result was a deeper, more refined flavor that everyone loved. Each bite offers a perfect balance of crisp cookie, chewy caramel, and velvety chocolate. Whether you’re baking for a special event, gifting, or simply indulging your sweet tooth, these Samoas are a treat worth mastering.
Why You’ll Love This Recipe
These cookies combine the texture of a shortbread base with the gooey richness of caramel and the tropical notes of toasted coconut. Unlike store-bought versions, these homemade Samoas are fresher, more flavorful, and customizable. They look impressive yet are easy to make with simple ingredients and basic equipment. The result is a batch of cookies that taste indulgent, look elegant, and make a perfect addition to any dessert platter.
Print
Homemade Samoas Cookies – Caramel, Coconut & Chocolate Bliss
- Total Time: 45 minutes
- Yield: 24 cookies
- Diet: Vegetarian
Description
These Homemade Samoas Cookies are a heavenly combination of buttery shortbread, gooey caramel, toasted coconut, and rich chocolate. Inspired by the beloved Girl Scout classic, these cookies deliver caramel-coconut bliss in every bite, with a satisfying crunch and chewy sweetness.
Ingredients
- 1 cup (230g) unsalted butter, softened
- 1/2 cup (100g) granulated sugar
- 2 cups (250g) all-purpose flour
- 1/4 tsp baking powder
- 1/2 tsp salt
- 1 tsp vanilla extract
- 3 cups (225g) sweetened shredded coconut
- 12 oz (340g) chewy caramels (about 40 pieces)
- 3 tbsp milk or cream
- 10 oz (285g) semisweet chocolate, chopped or in chips
Instructions
- Preheat oven to 350°F (175°C) and line baking sheets with parchment paper.
- In a bowl, cream butter and sugar until light and fluffy. Add vanilla.
- Whisk flour, baking powder, and salt together, then add to butter mixture. Mix until dough forms.
- Roll dough between sheets of parchment to 1/4-inch thickness. Cut into circles (about 2 inches wide), then cut a smaller circle from the center to form a ring.
- Place cookies on prepared sheets and bake for 10–12 minutes or until lightly golden. Cool completely.
- Spread shredded coconut evenly on a baking sheet and toast in the oven for 5–7 minutes, stirring occasionally, until golden brown.
- In a microwave-safe bowl, melt caramels with milk in 30-second intervals, stirring until smooth. Stir in toasted coconut.
- Spread or press the caramel-coconut mixture on top of cooled cookies.
- Melt chocolate and dip the bottoms of cookies into it. Place on parchment paper, then drizzle remaining chocolate over the top.
- Let cookies set at room temperature or refrigerate briefly to harden chocolate.
Notes
- Use homemade caramel sauce instead of packaged caramels for a richer flavor.
- If dough becomes too soft while cutting, chill for 15 minutes before baking.
- Store cookies in an airtight container for up to 5 days or freeze for up to 2 months.
- To make them gluten-free, substitute with 1:1 gluten-free flour blend.
- Prep Time: 30 minutes
- Cook Time: 15 minutes
- Category: Dessert
- Method: Baking
- Cuisine: American
Ingredients
(Tip: You can find the complete list of ingredients and their measurements in the recipe card below.)
Each component plays a crucial role in creating the iconic layers and texture of Samoas.
All-purpose flour – Forms the structure of the shortbread base, ensuring it’s crisp but tender.
Unsalted butter – Provides richness and that signature buttery melt-in-your-mouth texture.
Granulated sugar – Sweetens the cookie base and adds a delicate crunch to each bite.
Salt – Balances the sweetness and enhances all the other flavors.
Vanilla extract – Adds warmth and depth to both the cookie and caramel layers.
Soft caramels – The foundation of the chewy topping; melt them down for that gooey, luxurious layer.
Heavy cream – Blends with the caramel for a smooth, pourable consistency.
Toasted shredded coconut – The star of the show, offering nutty aroma and crisp texture that contrasts beautifully with the soft caramel.
Semi-sweet chocolate chips – Used for dipping and drizzling; they provide a luscious base and top finish.
Coconut oil or butter (optional) – Helps thin the chocolate slightly for smoother dipping.
Directions
Begin by preheating your oven to 350°F (175°C). Line two baking trays with parchment paper. In a large mixing bowl, cream together butter and sugar until light and fluffy. Add vanilla extract and a pinch of salt. Gradually mix in the flour until a soft dough forms. If the dough feels too dry, add a teaspoon of milk to bring it together.
Roll the dough out on a lightly floured surface to about ¼ inch thick. Use a round cookie cutter to cut out circles, then use a smaller cutter to remove the centers (creating the signature ring shape). Transfer the cookies to the baking trays and bake for 10–12 minutes, or until lightly golden around the edges. Allow to cool completely.
Meanwhile, melt the caramels with heavy cream in a saucepan over low heat, stirring until smooth. Stir in toasted coconut until evenly coated. Spread or press the caramel-coconut mixture over each cookie. Let them set for a few minutes.
Melt chocolate chips with a small spoon of coconut oil until smooth. Dip the bottoms of each cookie into the chocolate, place them on parchment paper, and drizzle the remaining chocolate over the tops. Allow the cookies to set at room temperature or refrigerate briefly until the chocolate firms up.
Equipment needed :
Must-Have Tools to Get Rolling
Silicone Spatula – Durable, heat-resistant silicone spatula perfect for mixing, scraping, and spreading. Gentle on non-stick cookware and easy to clean.
Large pot – You’ll need this to boil the whole cabbage head and soften the leaves.
large bowl –Spacious, durable large bowl ideal for mixing, serving, or food preparation. Made from sturdy material and easy to clean.
Sharp knife – For coring the cabbage and slicing out the thick stem in each leaf. A paring knife works best.
Mixing bowl – A big bowl makes it easier to combine your meat and rice filling evenly.
Cutting board – For prepping cabbage leaves and rolling them like a pro.
9×13-inch baking dish – Ideal size to fit your rolled cabbage leaves snugly and prevent them from unraveling.
knife – A sharp, durable kitchen knife perfect for slicing, chopping, and dicing with ease
Servings and timing
This recipe makes about 20–24 cookies. Prep time is around 25 minutes, baking takes 12 minutes, and assembly plus cooling adds another 25 minutes, making the total time approximately 1 hour from start to finish.
Storage/reheating
Store cookies in an airtight container at room temperature for up to 5 days. For longer storage, refrigerate for up to 10 days or freeze for up to 2 months. Let frozen cookies thaw at room temperature before serving. For that freshly dipped taste, warm them slightly in the microwave for 5–7 seconds before enjoying.
Variations and Customizations
Dark Chocolate Indulgence
Use dark chocolate for a bolder, less sweet contrast that complements the caramel beautifully.
Salted Caramel Samoas
Sprinkle a touch of flaky sea salt over the caramel layer for an elevated sweet-and-salty twist.
Gluten-Free Delight
Use a 1:1 gluten-free flour blend to make these cookies completely gluten-friendly without losing their texture.
Almond Crunch
Add a handful of finely chopped toasted almonds into the coconut topping for extra crunch and nutty flavor.
White Chocolate Drizzle
Drizzle melted white chocolate over the finished cookies for a visually stunning contrast.
Coffee-Infused Caramel
Add a teaspoon of espresso powder to the caramel for a subtle mocha undertone that pairs beautifully with coconut.
Vegan Samoas
Replace butter with coconut oil, heavy cream with coconut cream, and use vegan chocolate for a fully plant-based treat.
Mini Samoas Bites
Shape smaller rounds to make bite-sized versions—perfect for parties or gift boxes.
FAQs
Can I use store-bought caramel?
Yes, but make sure it’s thick and rich enough to hold the coconut mixture without running.
Can I toast the coconut in advance?
Absolutely. Toast it a day ahead and store in an airtight container to save time.
Why did my cookies spread too much?
The butter may have been too soft. Chill the dough for 10–15 minutes before baking.
Can I use milk chocolate instead of semi-sweet?
Yes, but it will make the cookies sweeter and less balanced.
How do I get perfectly shaped rings?
Use two cookie cutters—a large one for the base and a smaller one for the center hole.
Can I use homemade caramel?
Definitely. It gives an even richer flavor and smoother texture than store-bought versions.
Can I freeze the dough?
Yes, the shortbread dough freezes beautifully for up to two months.
How do I keep the caramel from sticking to my fingers?
Lightly grease your fingers or spatula before spreading the caramel mixture.
Can I make these without coconut?
You can, though it won’t be a true Samoa. Substitute finely chopped nuts for a similar texture.
How do I make the chocolate drizzle neat?
Use a piping bag or small spoon to control the amount and direction of the drizzle.
Conclusion
These Homemade Samoas Cookies – Caramel, Coconut & Chocolate Bliss are the definition of indulgence. Every layer, from the buttery shortbread to the caramel-coconut topping and chocolate finish, delivers harmony in flavor and texture. They’re nostalgic yet elevated—perfect for gifting, entertaining, or simply treating yourself. Once you make these at home, you’ll never look at store-bought Samoas the same way again. With their stunning appearance and unforgettable taste, these cookies are pure homemade luxury.
Hungry for more? Visit our website for full recipes and follow us on Pinterest for daily foodie inspo you’ll love to pin!