Why You’ll Love This Recipe
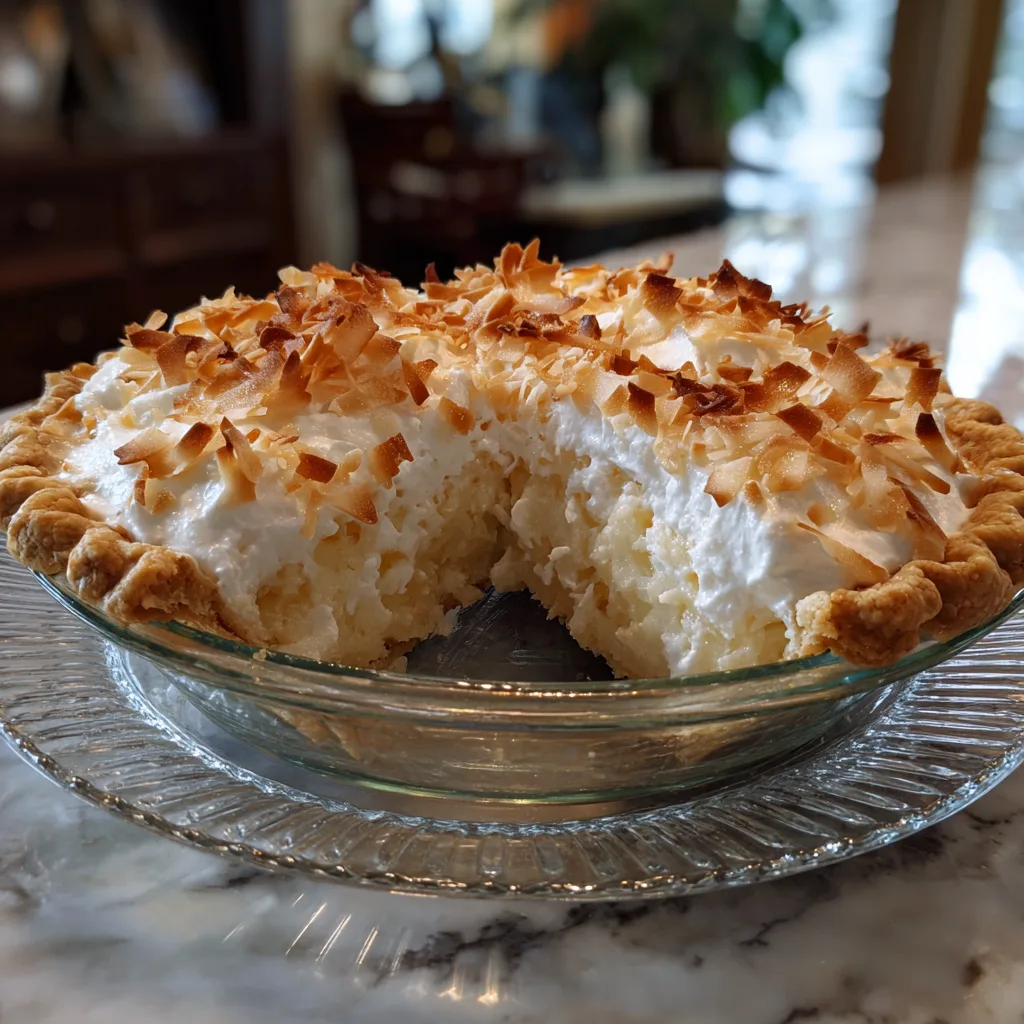
Old-fashioned coconut cream pie is one of those timeless desserts that instantly brings comfort and nostalgia to the table. With its flaky pie crust, creamy coconut filling, and a generous topping of whipped cream and toasted coconut, this pie is a showstopper that feels both homey and elegant. It’s perfect for holidays, family gatherings, or simply when you’re craving a dessert that feels extra special. The balance of the rich custard and light topping makes it satisfying without being overwhelming. When I first made this pie, I swapped half of the milk with coconut milk for extra flavor, and it turned out beautifully—creamy, aromatic, and truly unforgettable. This recipe is proof that sometimes the classics remain unbeatable.
Print
Old-Fashioned Coconut Cream Pie
- Total Time: 4 hrs 45 mins (includes chilling)
- Yield: 8 servings
- Diet: Vegetarian
Description
A classic old-fashioned coconut cream pie with a flaky crust, creamy coconut custard filling, and a fluffy whipped cream topping, finished with toasted coconut.
Ingredients
- 1 (9-inch) pie crust, baked
- 3 cups whole milk
- 1 cup sweetened shredded coconut
- 3/4 cup granulated sugar
- 1/4 cup cornstarch
- 1/4 tsp salt
- 4 large egg yolks
- 2 tbsp unsalted butter
- 1 tsp vanilla extract
- 1 cup heavy cream
- 2 tbsp powdered sugar
- 1/2 tsp vanilla extract (for whipped cream)
- 1/4 cup toasted coconut (for topping)
Instructions
- Bake the pie crust according to package or recipe instructions. Let cool completely.
- In a medium saucepan, heat milk and shredded coconut over medium heat until hot but not boiling.
- In a separate bowl, whisk together sugar, cornstarch, salt, and egg yolks until smooth.
- Slowly pour in hot milk mixture, whisking constantly to temper the eggs.
- Return mixture to saucepan and cook over medium heat, stirring constantly, until thickened and bubbling.
- Remove from heat and stir in butter and vanilla extract.
- Pour filling into the cooled pie crust and smooth the top. Cover with plastic wrap directly on surface and refrigerate until set, about 4 hours.
- Whip heavy cream with powdered sugar and vanilla until stiff peaks form.
- Spread whipped cream over chilled pie and sprinkle with toasted coconut before serving.
Notes
- For extra flavor, toast the shredded coconut before adding it to the custard.
- Allow the pie to chill fully for best slicing results.
- Can be made a day ahead and stored in the refrigerator.
- Prep Time: 25 mins
- Cook Time: 20 mins
- Category: Dessert
- Method: Baking and stovetop
- Cuisine: American
Ingredients
(Tip: You can find the complete list of ingredients and their measurements in the recipe card below.)
Each ingredient in this coconut cream pie works together to create layers of texture and flavor, from the flaky crust to the creamy filling.
Pie crust – A flaky baked pie crust is the foundation of this dessert. You can use homemade or store-bought, but a well-baked crust adds texture and stability.
Sugar – Sweetens the custard filling, balancing the richness of the eggs and milk.
Egg yolks – These provide richness and help thicken the custard, giving it a silky, smooth texture.
Cornstarch – Essential for thickening the filling, ensuring it sets properly without being runny.
Whole milk – Acts as the creamy base of the filling, creating a luscious custard.
Coconut milk – Adds an extra depth of coconut flavor, making the pie taste more authentic.
Butter – A small amount of butter enriches the filling, giving it a velvety finish.
Vanilla extract – Enhances the custard with a warm, fragrant note that pairs beautifully with coconut.
Sweetened shredded coconut – Stirred into the filling and sprinkled on top, it delivers the signature flavor and texture of this classic dessert.
Heavy cream – Whipped cream serves as the topping, adding lightness and balancing the dense custard filling.
Powdered sugar – Sweetens and stabilizes the whipped cream topping without graininess.
Directions
Begin by blind-baking the pie crust. Roll out your dough, place it in the pie dish, and line with parchment and pie weights. Bake until golden and crisp, then set aside to cool.
To make the filling, whisk together sugar, cornstarch, and a pinch of salt in a saucepan. Slowly whisk in milk and coconut milk until smooth. Place over medium heat, stirring constantly until the mixture begins to thicken. Temper the egg yolks by whisking a small amount of the hot liquid into them, then return the mixture to the saucepan. Cook until thick and creamy. Remove from heat, stir in butter, vanilla, and shredded coconut.
Pour the custard into the cooled crust and smooth the top. Cover with plastic wrap directly on the surface to prevent a skin from forming. Chill in the refrigerator for at least four hours, or until set.
Before serving, whip the heavy cream with powdered sugar until soft peaks form. Spread or pipe over the chilled custard. Toast extra shredded coconut until golden and sprinkle generously on top. Slice and serve chilled for the best flavor and texture.
Servings and timing
This recipe makes one 9-inch pie, serving about 8 slices. Preparation takes 25 minutes, cooking the custard requires around 20 minutes, and chilling takes at least 4 hours. Overall, expect about 5 hours from start to finish, most of which is chilling time.
Storage/reheating
Coconut cream pie should always be kept chilled. Store covered in the refrigerator for up to 3 days. The crust may soften slightly over time, but the flavors remain delicious. Freezing is not recommended, as the custard can separate. Reheating is unnecessary—this dessert is best enjoyed cold.

Variations and Customizations
Toasted coconut crust – Swap the traditional pie crust for a coconut-graham cracker crust for extra flavor.
Meringue topping – Replace whipped cream with a golden meringue for a more vintage presentation.
Coconut-only filling – Use all coconut milk instead of part milk for an even stronger coconut taste.
Chocolate layer – Spread a thin layer of melted chocolate over the crust before adding the custard.
Nutty twist – Sprinkle toasted almonds or macadamia nuts over the whipped cream topping.
Mini pies – Make individual portions using small tart shells for parties or gatherings.
Dairy-free version – Use coconut milk for the filling and coconut cream for the topping to make it dairy-free.
FAQs
Can I make the pie ahead of time?
Yes, it can be made a day in advance and stored in the fridge until serving.
How do I prevent my custard from being runny?
Cook until it coats the back of a spoon and allow it to chill fully before slicing.
Can I use unsweetened coconut?
Yes, but sweetened coconut adds more flavor and balances the custard’s richness.
Do I need to blind-bake the crust?
Yes, since the filling is not baked, the crust must be fully baked beforehand.
Can I use a premade crust?
Absolutely, a store-bought pie shell works well and saves time.
How do I toast coconut properly?
Spread it on a baking sheet and bake at 350°F, stirring occasionally, until golden.
Can I substitute cornstarch with flour?
Yes, but cornstarch gives a smoother texture. If using flour, increase the amount slightly.
What’s the difference between coconut cream and coconut milk?
Coconut cream is thicker and richer, while coconut milk is lighter. Both work in this recipe.
Why does my pie filling have lumps?
It may have been cooked too quickly. Whisk constantly and avoid high heat.
Can I freeze leftovers?
Freezing is not recommended, as custard-based pies tend to separate when thawed.
Conclusion
Old-fashioned coconut cream pie is a true classic that delivers comfort and elegance in every slice. With its creamy coconut custard, flaky crust, and fluffy whipped topping, it’s the perfect balance of rich and light textures. Whether you’re serving it at a holiday dinner, a Sunday gathering, or just indulging in a homemade treat, this pie is guaranteed to bring smiles to the table. The beauty of this recipe lies in its simplicity—using pantry staples to create something unforgettable. Once you try it, you’ll see why it remains a beloved dessert across generations.
Hungry for more? Visit our website for full recipes and follow us on Pinterest for daily foodie inspo you’ll love to pin!