
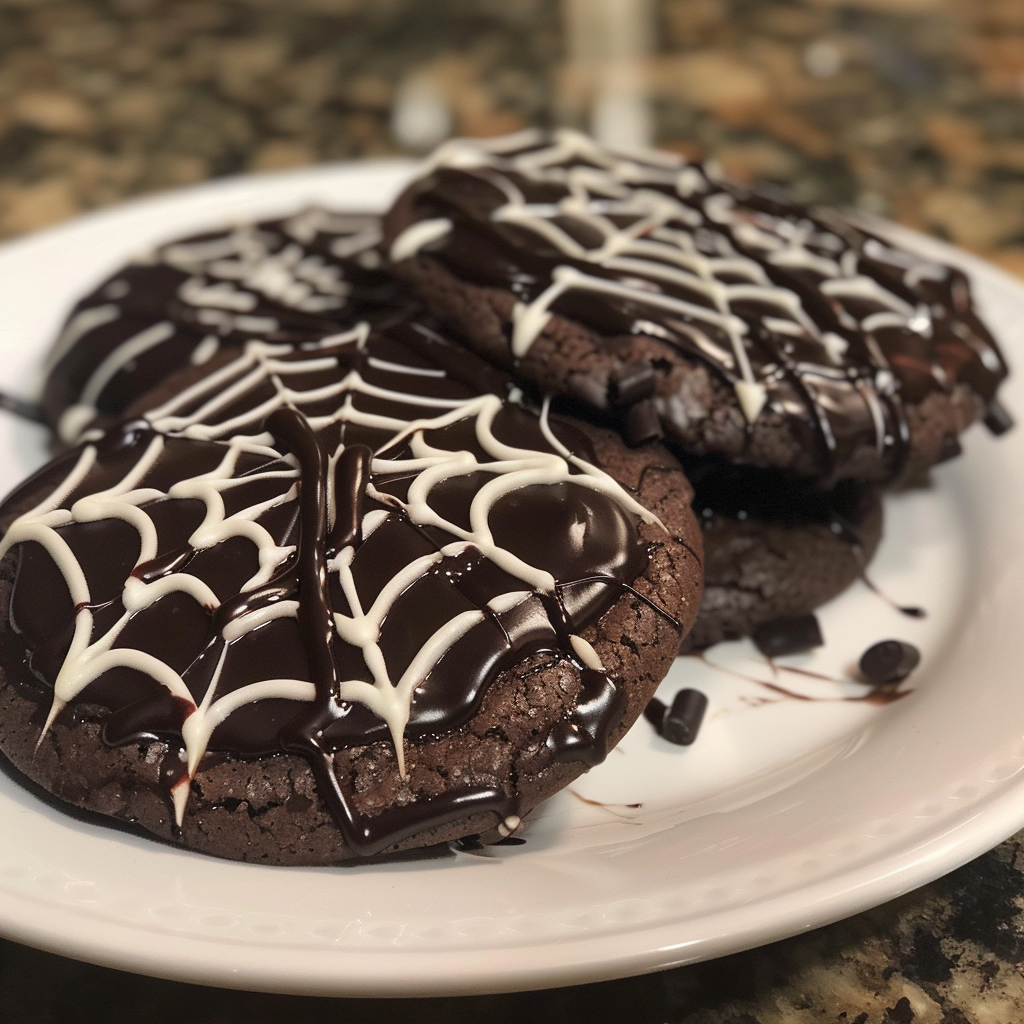
Halloween is more than just candy—it’s a whole vibe. And nothing screams spooky and scrumptious quite like a batch of Spiderweb Chocolate Cookies. These aren’t your basic Halloween sugar cookies. Oh no! They’re chewy, chocolatey, and decked out with edible spiderwebs that are equal parts creepy and cute.
In this article, we’re diving headfirst into everything you need to know about these festive cookies. From ingredients to decorating ideas, tips for baking with kids, and even how to store leftovers (if there are any!), this guide has it all. Whether you’re a baking newbie or a seasoned cookie master, you’re going to love how simple—and impressive—these cookies are.
Let’s kick things off with what exactly makes these cookies so popular and why Spiderweb Chocolate Cookies are the MVP of Halloween parties.
Spiderweb Chocolate Cookies: The Ultimate Halloween Treat Everyone Will Love
- Total Time: 32 minutes
- Yield: 24 cookies
- Diet: Vegetarian
Description
Fun and festive chocolate cookies decorated with a white chocolate spiderweb design, perfect for Halloween or themed parties.
Ingredients
- 1 cup unsalted butter, softened
- 1 cup granulated sugar
- 1 cup brown sugar, packed
- 2 large eggs
- 2 tsp vanilla extract
- 2 cups all-purpose flour
- 1 cup unsweetened cocoa powder
- 1 tsp baking soda
- 1/2 tsp baking powder
- 1/2 tsp salt
- 1 cup semisweet chocolate chips
- 1/2 cup white chocolate, melted (for decorating)
Instructions
- Preheat oven to 350°F (175°C) and line a baking sheet with parchment paper.
- In a large bowl, cream together butter, granulated sugar, and brown sugar until light and fluffy.
- Beat in eggs one at a time, then add vanilla extract.
- In a separate bowl, whisk together flour, cocoa powder, baking soda, baking powder, and salt.
- Gradually mix dry ingredients into the wet ingredients until well combined.
- Fold in chocolate chips.
- Scoop dough onto prepared baking sheet, spacing cookies about 2 inches apart.
- Bake for 10–12 minutes until set but still soft in the center. Cool completely on a wire rack.
- Transfer melted white chocolate into a piping bag or zip-top bag with a small corner snipped off. Pipe concentric circles on each cookie and use a toothpick to drag lines from the center outward to create a spiderweb pattern.
Notes
- For a Halloween twist, add candy spiders or sprinkles on top of the webs.
- Ensure cookies are completely cooled before decorating with white chocolate.
- Store in an airtight container at room temperature for up to 4 days.
- Prep Time: 20 minutes
- Cook Time: 12 minutes
- Category: Dessert
- Method: Baking
- Cuisine: American
Key Ingredients for Spiderweb Chocolate Cookies
When it comes to making Spiderweb Chocolate Cookies, quality ingredients make all the difference. These cookies aren’t just cute—they’re downright delicious. Let’s break down what you’ll need and why it matters.
All-Purpose Flour
The foundation of every cookie! Stick with all-purpose flour for the perfect soft texture that holds its shape while staying chewy inside.
Dark Cocoa Powder
For that spooky, rich chocolate base, Hershey’s Special Dark or black cocoa powder delivers bold flavor and dramatic color. It makes the spiderwebs pop visually!
Semi-Sweet Chocolate Chips
These melty pockets of chocolate goodness add texture and depth to every bite. Use high-quality chips for best results.
White Chocolate Chips
The secret to the signature spiderweb design! Melted and piped on top, they create that eerie, beautiful web.
Butter (Salted)
Salted butter balances the sweetness and enhances flavor. Make sure it’s softened before mixing.
Brown + White Sugar
This dynamic duo gives your cookies the perfect balance—chewy from the brown sugar, slightly crisp from the white.
Eggs & Vanilla Extract
These bind everything together and add richness and warmth to the dough.
How to Make Spiderweb Chocolate Cookies Step by Step
Ready to bake some spooky goodness? These Spiderweb Chocolate Cookies come together faster than you’d think—and no fancy tools needed!
Step 1: Cream Butter and Sugars
In a large bowl, beat softened salted butter, brown sugar, and white sugar until fluffy—about 2–3 minutes. This adds air, making cookies light yet chewy.
Step 2: Add Eggs and Vanilla
Crack in the eggs one at a time, then pour in vanilla extract. Mix until smooth and well-combined.
Step 3: Mix Dry Ingredients
In another bowl, whisk flour, dark cocoa powder, baking soda, and salt. Slowly add the dry mix to the wet ingredients.
Step 4: Fold in Chocolate Chips
Gently stir in semi-sweet chocolate chips. The dough should be rich, dark, and slightly sticky.
Step 5: Scoop and Bake
Scoop 1.5 tbsp-sized balls onto a lined baking sheet. Bake at 350°F (175°C) for 8–10 minutes. Don’t overbake—soft centers are key!
Step 6: Decorate with Spiderwebs
Melt white chocolate chips, pipe spirals onto warm cookies, then drag a toothpick from the center outward to create spiderwebs.
Essential Equipment for Making Spiderweb Chocolate Cookies
You don’t need a professional kitchen setup to make Spiderweb Chocolate Cookies—just a few everyday tools and a pinch of Halloween spirit! Here’s what you’ll need to whip up this spooky treat with ease:
Mixing Bowls
You’ll need at least two—one for wet ingredients and one for dry. Go for medium to large bowls for easy mixing without the mess.
Electric Mixer or Stand Mixer
Creaming the butter and sugar by hand is tough! An electric hand mixer or a stand mixer with the paddle attachment makes things smoother and faster.
Measuring Cups and Spoons
Accurate measurements matter in baking. Use proper dry and liquid measuring sets to keep your dough consistent.
Baking Sheets
Flat and sturdy cookie sheets are perfect for even baking. Line them with parchment paper to prevent sticking and make cleanup a breeze.
Cookie Scoop
A 1.5-tablespoon scoop helps make evenly sized cookies for that bakery-style look.
Microwave-Safe Bowl or Bag
For melting white chocolate chips. You can use a zip-top bag for piping the spiderwebs.
Toothpicks
To create those iconic spiderweb patterns—simple but super effective!
Tasty Variations for Spiderweb Chocolate Cookies
Want to make your Spiderweb Chocolate Cookies stand out even more? You’re in luck! These cookies are incredibly flexible, so you can tweak the ingredients or presentation to suit your vibe—whether you’re baking for picky eaters, food allergies, or just for fun.
Swap the Sweeteners
Don’t want to use white sugar? No problem. Try coconut sugar or maple sugar for a slightly richer flavor with a hint of caramel. It’ll still give you that dreamy chewy texture.
Go Gluten-Free
Gluten-sensitive? Use a 1:1 gluten-free flour blend like King Arthur’s Measure for Measure. Just be sure to chill the dough a bit longer—it helps the cookies hold their shape.
Use Black Cocoa for a Darker Look
Want a bolder, gothic cookie base? Swap dark cocoa for black cocoa powder. It gives a super rich color that makes those white chocolate webs seriously pop.
Different Web Toppings
Not into white chocolate? You can totally use royal icing, a powdered sugar glaze, or even melted candy melts in Halloween colors like orange or purple.
Add Halloween Sprinkles or Candy Eyes
Before the white chocolate sets, toss on some spooky sprinkles or place candy eyeballs right in the center. It’s creepy in the best way!
Frequently Asked Questions About Spiderweb Chocolate Cookies
You’ve got questions—and trust us, you’re not the only one! Whether it’s your first time baking Halloween cookies or you’re just curious about cookie storage or alternatives, this FAQ section has you covered.
How do you make spiderwebs with melted chocolate?
It’s easier than it looks! Melt your white chocolate chips in a microwave-safe zip bag or piping bag. Snip off a small corner to pipe a thin spiral over each cookie. Starting from the center, use a toothpick to gently drag lines outward—like the spokes of a wheel. That’s it! You’ve got a spooky little chocolate spiderweb cookie masterpiece.
Can I use royal icing instead of white chocolat
Totally! If you’re not a fan of white chocolate or need a dairy-free option, royal icing works just as well. Mix powdered sugar, a splash of milk (or plant milk), and vanilla until smooth. Pipe it on just like melted chocolate. Icing gives a slightly firmer finish and dries quicker, too.
Can these be made gluten-free?
Yes, and they’re just as delicious. Use a 1:1 gluten-free flour blend like King Arthur or Bob’s Red Mill. Make sure to let the dough rest 15–20 minutes before baking—it helps prevent crumbling and improves texture.
How long do Spiderweb Cookies last?
When stored in an airtight container at room temperature, these Halloween cookies stay fresh for up to 3 days. Want to keep them longer? Freeze the undecorated cookies for up to 3 months. Just add the spiderwebs once they’re thawed and ready to serve.
Hungry for more? Visit our website for full recipes and follow us on Pinterest for daily foodie inspo you’ll love to pin!