
Introduction
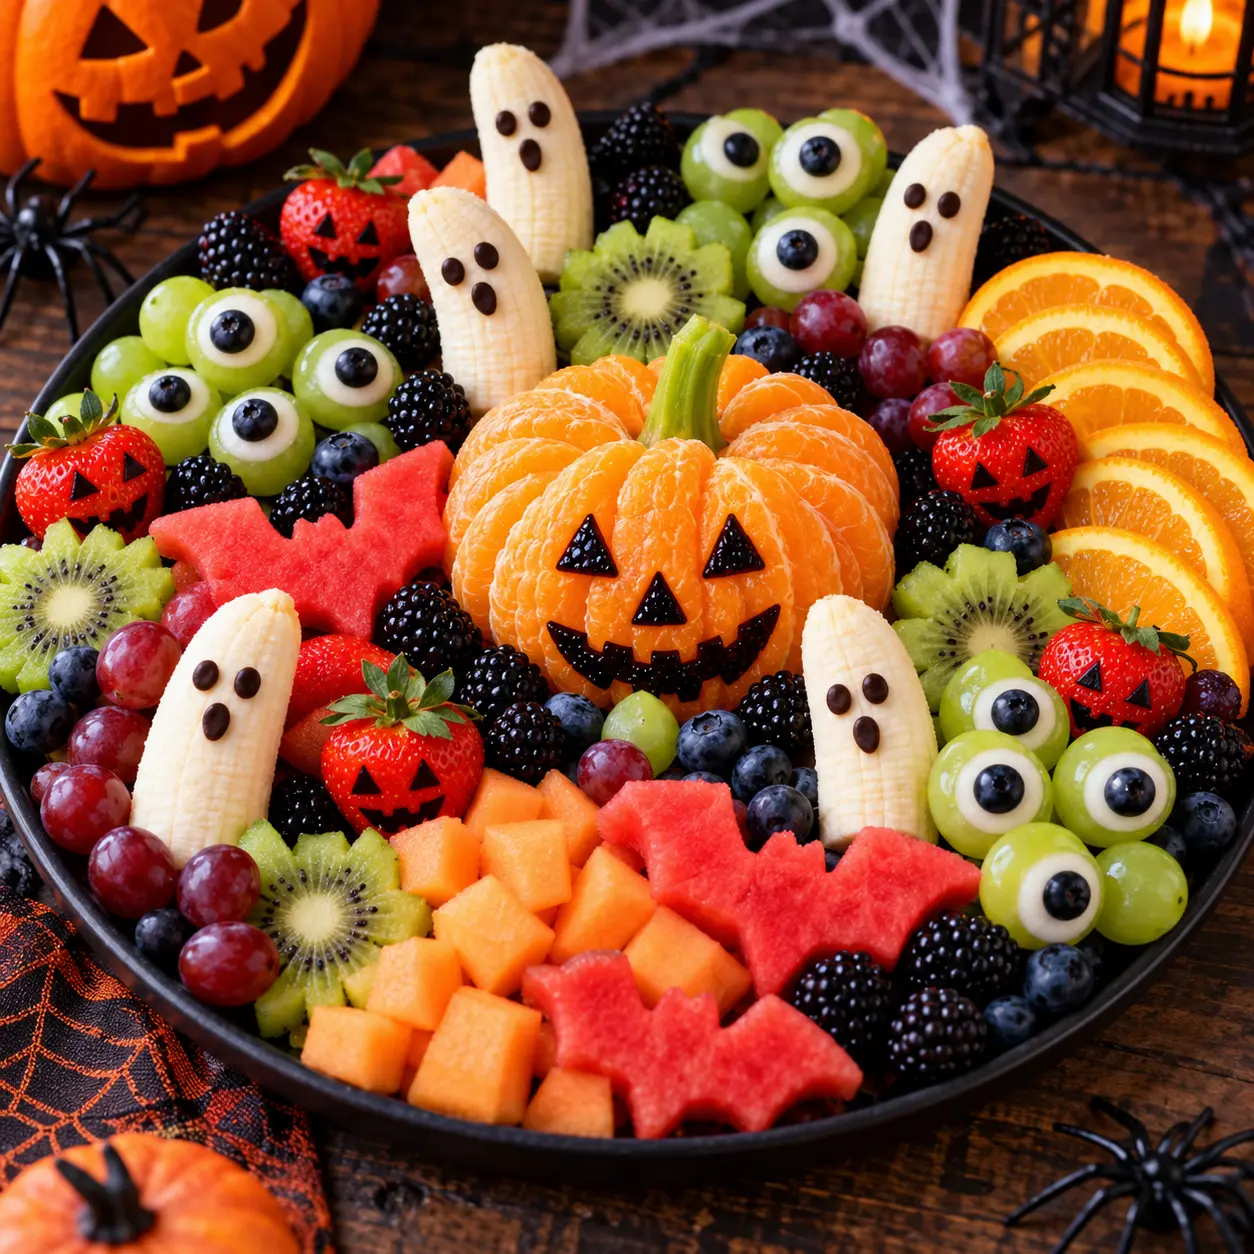
Halloween does not have to be all about candy. A colorful Halloween fruit tray is an easy way to bring something fresh, festive, and naturally sweet to your Halloween table. With a few simple fruits and some creative cutting, you can turn ordinary produce into spooky ghosts, creepy eyes, pumpkins, and other fun Halloween shapes.
I love making fruit trays for Halloween because they require very little cooking and can be prepared ahead of time. The best part is that you can easily adapt the tray to whatever fruit you already have at home. I have found that strawberries, grapes, melon, bananas, oranges, and blueberries work particularly well because their colors naturally fit the Halloween theme.
Whether you are preparing a Halloween party for children, hosting friends, or simply want a fun seasonal snack, this Halloween fruit tray is a quick, refreshing, and irresistible addition to the table.
Why You’ll Love This Recipe
- Quick and easy to assemble with minimal preparation.
- Naturally sweet and colorful without relying on candy.
- Perfect for Halloween parties, school events, and family gatherings.
- Easy to customize with your favorite seasonal fruits.
- Can be prepared ahead of time and chilled before serving.
- Makes a beautiful centerpiece for a Halloween food table.
- A fun way to encourage children to enjoy more fruit.
Ingredients of Halloween Fruit Tray
(Tip: You can find the complete list of ingredients and their measurements in the recipe card below.)
Strawberries add a vibrant red color to the tray and look especially festive alongside darker fruits. Choose firm, ripe strawberries so they hold their shape well.
Green grapes provide a fresh, juicy element and are perfect for filling empty spaces on the tray. Their round shape also works nicely for spooky “eyeballs.”
Blueberries bring a deep purple-blue color that creates a dramatic Halloween appearance. They are also excellent for adding small decorative details.
Bananas can be transformed into simple little ghosts. Their pale color makes them one of the easiest fruits to use for a spooky Halloween design.
Orange slices add bright color and juicy sweetness. You can arrange them in overlapping circles to create a pumpkin-inspired section.
Watermelon is useful for creating larger Halloween shapes. You can cut it into cubes, triangles, or simple spooky shapes using small cookie cutters.
Blackberries add a dark, almost black color that instantly makes the platter look more Halloween-themed. Their rich color contrasts beautifully with lighter fruits.
Mini chocolate chips can be used sparingly to decorate banana ghosts or other fruit shapes. They add a little indulgence while keeping the fruit tray visually playful.
How to Make Halloween Fruit Tray
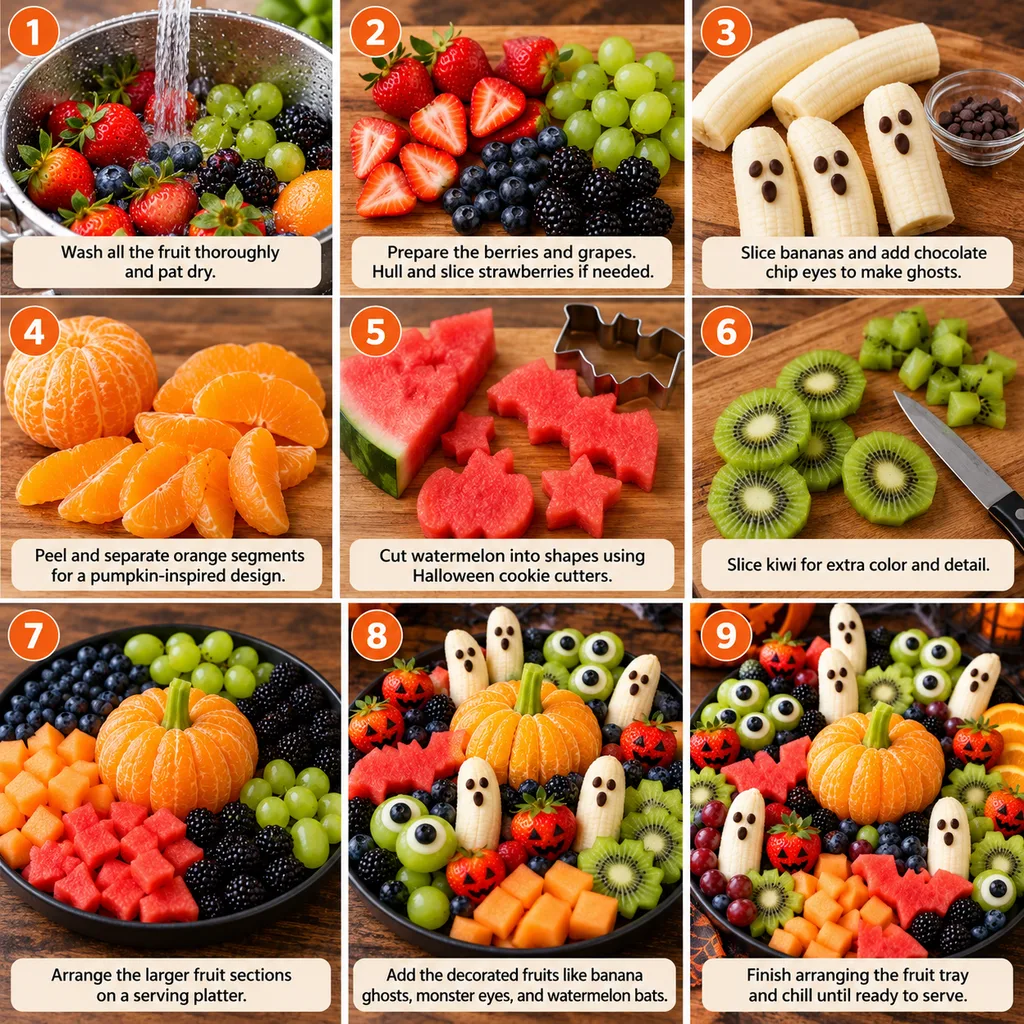
Start by washing all the fruit thoroughly under cool running water. Dry everything carefully, especially berries and grapes, because excess moisture can make the fruit tray watery.
Prepare the strawberries by removing the green tops and cutting larger berries in half if desired. Leave smaller strawberries whole for variety.
Slice the bananas into thick pieces. To make simple banana ghosts, arrange the slices upright or place larger banana pieces on the tray and use tiny chocolate chips to create eyes.
Wash and dry the grapes, blueberries, and blackberries. Keep some of the berries whole so they can be scattered around the tray for a natural, abundant appearance.
Peel the oranges and separate them into segments. Arrange the segments in a circular pattern to create a pumpkin-inspired design. You can add a small piece of green fruit at the top as a stem.
Cut the watermelon into bite-sized cubes or use Halloween-themed cookie cutters to create simple shapes such as stars, pumpkins, or bats.
Now choose a large serving platter or wooden board. Begin by placing the larger fruit sections first, leaving enough space between groups for the colors to stand out.
Add the smaller fruits around the larger pieces. Alternate bright and dark colors to create contrast and make the Halloween design more dramatic.
Finish by adding the banana ghosts and any small decorative fruit details. If using chocolate chips, add them just before serving so they stay firmly in place.
Chill the completed tray until you are ready to serve.
Common Mistakes to Avoid
- Using overripe bananas that become soft and difficult to arrange.
- Cutting fruit too far in advance, which can cause it to lose freshness.
- Leaving washed fruit wet, which may make the platter watery.
- Overcrowding the tray and hiding the individual fruit designs.
- Using too many fruits with similar colors instead of creating contrast.
- Adding chocolate chips too early to moist fruit.
- Cutting watermelon shapes too thin, which can make them difficult to move.
Equipment Needed
You only need a few basic kitchen tools to prepare and arrange this festive fruit tray.
Must-Have Tools to Get Rolling
Here’s what you’ll want to have on hand:
- Large serving platter or wooden board
- Sharp kitchen knife
- Cutting board
- Small Halloween cookie cutters
- Small serving bowls, if desired
- Toothpicks for optional decorative details
Servings and Timing
- Servings: 8–10
- Prep Time: 25 minutes
- Cook Time: 0 minutes
- Total Time: 25 minutes
Storage/Reheating
Cover leftover fruit tightly and refrigerate it for up to 1–2 days. Keep bananas separate when possible because they brown more quickly than most other fruits. This recipe does not require reheating. For the freshest presentation, assemble the tray shortly before serving.
Variations and Customizations
One of the best things about a Halloween fruit tray is how flexible it can be. You do not need to follow a strict ingredient list to create something impressive.
For a Halloween monster tray, arrange green grapes in a large circular shape and place blueberries in the center as eyes. Use banana slices or apple pieces to create teeth around the edge.
For spooky ghosts, use banana pieces and small chocolate chips for eyes. You can also use pear slices if you prefer a fruit that holds its shape a little better.
For a pumpkin-inspired tray, use orange segments arranged in overlapping circles. Add a small piece of kiwi or green grape at the top to represent the stem.
If you want a more colorful presentation, add pineapple, kiwi, raspberries, mango, or dragon fruit. Bright yellow pineapple and green kiwi create excellent contrast against blueberries and blackberries.
For a kid-friendly version, let children help arrange the fruit. Provide several bowls of prepared fruit and allow them to create their own monsters, faces, or Halloween scenes.
You can also make individual Halloween fruit cups instead of one large tray. Layer colorful fruit in clear cups and finish each one with a spooky fruit face.
For a slightly more indulgent option, serve the fruit with a bowl of yogurt dip. Vanilla, Greek yogurt, or honey-yogurt dip pairs particularly well with berries and melon.
If you are preparing the tray for adults, consider adding more sophisticated fruit combinations such as figs, pomegranate seeds, pears, grapes, and citrus. A large wooden serving board can make the presentation feel especially elegant.
You can even turn the tray into a centerpiece by arranging the fruit around a small bowl of dip in the middle and building the colors outward.
Nutrition and Dietary Info
Nutrition will vary depending on the exact fruits and quantities used. The following is an approximate estimate per serving based on a tray serving 10 people.
| Nutrition | Per Serving |
|---|---|
| Calories | 85 kcal |
| Protein | 1.1 g |
| Carbohydrates | 21 g |
| Fat | 0.4 g |
| Saturated Fat | 0.1 g |
| Fiber | 3.2 g |
| Sugar | 15 g |
| Sodium | 3 mg |
This Halloween fruit tray is naturally vegetarian, vegan, and gluten-free when prepared without chocolate chips or when using suitable dairy-free chocolate decorations.
Expert Tips & Customizations
Choose Firm Fruit: Firm strawberries, grapes, melon, and slightly underripe bananas are easier to arrange and maintain their appearance.
Think About Color: Halloween presentation looks best when you combine bright orange, red, green, purple, and dark berries.
Prepare Strategically: Wash and cut most fruit ahead of time, but leave bananas and other fruits prone to browning until closer to serving.
Use Cookie Cutters: Small cutters make watermelon and melon shapes much easier and more consistent.
Create Contrast: Place dark berries beside pale bananas and bright citrus to make the spooky details stand out.
Keep It Fresh: Refrigerate the finished platter until shortly before serving.
Make It Interactive: For children’s parties, prepare the fruit in bowls and let guests build their own spooky fruit faces.
FAQs
Can I make a Halloween fruit tray the night before?
You can prepare many of the fruits the night before, but it is best to assemble the final tray shortly before serving. Bananas and other fruits that brown quickly should be prepared last.
What fruit is best for Halloween fruit trays?
Grapes, strawberries, blueberries, blackberries, oranges, bananas, watermelon, melon, pineapple, and kiwi are excellent choices because they offer different colors and shapes.
How do I make fruit look spooky?
Use fruit shapes and contrasting colors to create ghosts, eyes, pumpkins, monsters, and other Halloween designs. Small chocolate chips can also be used for eyes.
How far in advance can I prepare the fruit?
Most cut fruit can be prepared several hours ahead and refrigerated. For the best appearance, assemble the platter a few hours before serving.
Can I make this fruit tray without chocolate?
Absolutely. The tray is delicious without chocolate. Blueberries, blackberries, raisins, or small pieces of fruit can be used to create eyes and other decorative details.
Is a Halloween fruit tray suitable for children?
Yes. It is a fun, colorful snack for children, although whole grapes and other round foods should be cut appropriately for young children to reduce choking risk.
Conclusion
A Halloween fruit tray is proof that a party snack can be both healthy and incredibly fun. With colorful fruit, a little creativity, and a few simple shapes, you can create a festive centerpiece that looks impressive without spending hours in the kitchen. Whether you make spooky banana ghosts, orange pumpkins, berry eyeballs, or a playful monster design, this easy Halloween fruit tray is sure to disappear quickly. It is fresh, naturally sweet, customizable, and perfect for sharing at any Halloween celebration.
Print
Halloween Fruit Tray: A Fun, Healthy, and Spooky Party Snack
- Total Time: 20 minutes
- Yield: 12 servings
- Diet: Vegan
Description
A fun and festive Halloween fruit tray arranged with colorful fresh fruit and spooky decorations, perfect for parties and fall gatherings.
Ingredients
- 2 cups strawberries
- 2 cups green grapes
- 2 cups blueberries
- 2 cups pineapple chunks
- 2 cups watermelon, cut into Halloween shapes
- 2 bananas, sliced
- 1 orange, peeled and separated into segments
- Edible candy eyes, for decorating
Instructions
- Wash and thoroughly dry all fresh fruit.
- Cut the watermelon into Halloween-themed shapes such as pumpkins, ghosts, or bats using small cookie cutters.
- Arrange the strawberries, grapes, blueberries, pineapple, watermelon shapes, banana slices, and orange segments on a large serving tray.
- Add edible candy eyes to selected fruit pieces to create spooky faces.
- Serve immediately or refrigerate until ready to serve.
Notes
- Use any combination of colorful seasonal fruit you enjoy.
- Add Halloween-themed cookie cutters or decorative picks for extra flair.
- For best appearance, add bananas shortly before serving to reduce browning.
- Prep Time: 20 minutes
- Cook Time: 0 minutes
- Category: Appetizer
- Method: No-Cook
- Cuisine: American